


Generate files cho VueJS bằng CLI với Plopjs
a little tool that saves you time and helps your team build new files with consistency.


Chào các bạn, Lâu lắm rồi mình mới quay trở lại viết do deadline dí sát quá 🥲🥲🥲
Bắt đầu nhé, nếu bạn muốn tạo một component trong Vue thì sẽ như thế nào? Theo flow thông thường thì sẽ tạo một file và cấu trúc vào như thế này phải không.
<template>
  <div>A Component</div>
</template>

<script>
export default {}
</script>

<style scoped></style>
Đó là công việc thủ công khá nhàm chán, nếu bạn đã dùng Angular CLI thì chắc sẽ biết đến lệnh
ng generate component <path>
Hôm nay mình sẽ hướng dẫn các bạn cách tạo công cụ đó nhưng ở một bước nâng cao hơn, bạn có thể tự điều chỉnh cho các framework khác, riêng bài viết này mình dùng cho VueJS nhé (tại mình là fanboy :v)
1. Giới thiệu Plot.js ( https://plopjs.com/ )
Plop is a little tool that saves you time and helps your team build new files with consistency.
Đọc dòng giới thiệu xong thì các bạn cũng hiểu sơ sơ rồi phải không, đây là một công cụ giúp chúng ta config sẵn công việc tạo file một cách thống nhất trong team, ví dụ như: component, module trong store, module trong router, common data,...
Cài đặt plop một cách bình thường nhé:
#npm
npm install --save-dev plop
#yarn
yarn add -D plop
2. Cài đặt
Đầu tiên bạn tạo một plopfile.js ở root folder.
// Import hết các template vào
const viewGenerator = require('./plop-templates/view/prompt')
const componentGenerator = require('./plop-templates/component/prompt')
const storeGenerator = require('./plop-templates/store/prompt.js')

// Tạo function để plop có thể map vào cli
module.exports = function(plop) {
  // plop view
  plop.setGenerator('view', viewGenerator)
  // plop component
  plop.setGenerator('component', componentGenerator)
  // plop store
  plop.setGenerator('store', storeGenerator)
}
Ứng với mỗi command bạn sẽ tạo một folder bao gồm file template và file cấu hình hướng dẫn plop làm việc.
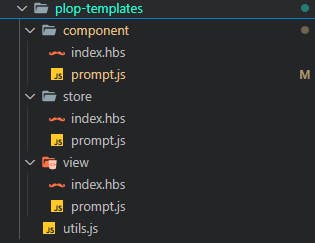
Ví dụ như cấu hình cho command tạo component
<!-- plop-templates/component/index.hbs -->
{{#if template}}
<template>
  <div />
</template>
{{/if}}

{{#if script}}
<script>
export default {
  name: '{{ properCase name }}',
  props: {},
  data() {
    return {}
  },
  created() {},
  mounted() {},
  methods: {}
}
</script>
{{/if}}

{{#if style}}
<style lang="scss" scoped>

</style>
{{/if}}
Ở đây mình cấu hình cho plop sẽ gồm 3 công việc đó là hỏi tên của component (có validate nếu trống), thư mục sẽ tạo component, các phần trong file hbs sẽ được generate.
Các type của command thì bạn có thể tham khảo tại đây Inquirer.js
/* plop-templates/component/prompt.js*/
const { notEmpty } = require('../utils.js')

module.exports = {
  description: 'generate vue component',
  prompts: [
  // Hỏi tên của component
  {
    type: 'input',
    name: 'name',
    message: 'component name please',
    validate: notEmpty('name')
  },
   /* Hỏi folder tạo componet với dạng select, ở đây mình dùng theo
   Atomic Design nên mình sẽ config theo */
  {
    type: "list",
    name: "level",
    message: "What level of atomic design?",
    choices:[{
      name: "Atoms",
      value: "atoms"
    },
    {
      name: "Molecules",
      value: "molecules"
    },
    {
      name: "Organisms",
      value: "organisms"
    },
    {
      name: "Templates",
      value: "templates"
    },
  ],
  },
  // Check xem cần phải generate phần nào trong file template
  {
    type: 'checkbox',
    name: 'blocks',
    message: 'Blocks:',
    choices: [{
      name: '<template>',
      value: 'template',
      checked: true
    },
    {
      name: '<script>',
      value: 'script',
      checked: true
    },
    {
      name: 'style',
      value: 'style',
      checked: true
    }
    ],
    validate(value) {
      if (value.indexOf('script') === -1 && value.indexOf('template') === -1) {
        return 'Components require at least a <script> or <template> tag.'
      }
      return true
    }
  }
  ],
  // Đây là phần plop sẽ làm những công việc sau khi nhận các tham số trên
  actions: data => {
    /* Bạn có thể đổi case của tham số theo Case Modifiers
    https://github.com/plopjs/plop#case-modifiers */
    const name = '{{properCase name}}'
    const level = '{{lowerCase level}}'

    const actions = [{
      type: 'add',
      path: `src/components/${level}/${name}.vue`,
      templateFile: 'plop-templates/component/index.hbs',
      data: {
        name: name,
        template: data.blocks.includes('template'),
        script: data.blocks.includes('script'),
        style: data.blocks.includes('style')
      }
    }]

    return actions
  }
}
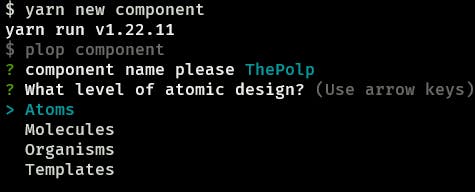
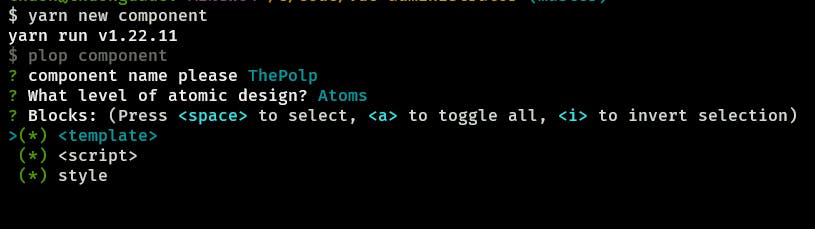
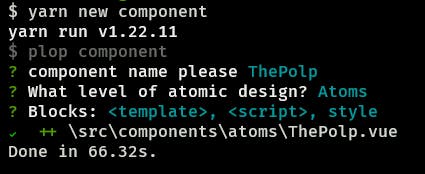
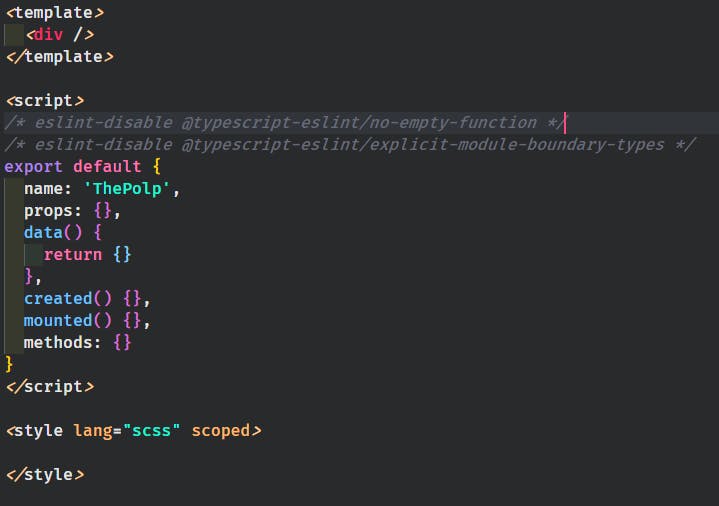
Kết quả chúng ta sẽ đươc như sau
3. Kết luận
Với công cụ này sẽ tiết kiệm phần công việc thủ công trước đây, tạo sự thống nhất cho các thành viên mới của team nếu team theo một chuẩn nào đó. Đối với các framework hay cấu trúc khác nhau các bạn đều có thể tự mình config theo mà không bị rào cản nào cả. Cảm ơn các bạn đã đọc ❤️